Hello reader, welcome to this blog! I am sorry to start it on a dead-ly note, but rest assured this blog has nothing to do with anything violent. I will be talking about failing app deployments (violently, if it is in production) and how to get an instant notification when they fail.
Why do app deployments fail?
Before understanding why apps fail, we must understand what kind of apps we are discussing. By far the most popular kind of apps are web apps that run our beloved internet. Usually, the web apps need to be served by a web server. Here are some reasons why web servers might fail:
Resource overload, like server dying due to too much traffic, out-of-memory etc.
Cyberattacks, like DDoS (distributed denial-of-service) or other vulnerabilities.
Bugs, which can happen to the best of software.
Server component failures, power outages or any natural causes that can impact a data centre where the server is hosted.
Dead man what?
Dead Man's Switch, existed long before computers were born. Quoting Wikipedia, here goes the definition:
A dead man's switch is a switch that is designed to be activated or deactivated if the human operator becomes incapacitated, such as through death, loss of consciousness, or being bodily removed from control. Originally applied to switches on a vehicle or machine, it has since come to be used to describe other intangible uses, as in computer software.
Focusing on the last line of the definition, a software use of Dead Man's Switch should work like this in our server failure scenario:
😵
When the server fails, flip the switch
Now, how to detect if the server has failed or not? There are two ways to do that -
Heartbeat: Our server sends a signal (say an HTTP request) to a monitoring service in periodic intervals.
Polling: A monitoring service sends a request to our server to check if it's alive in periodic intervals.
In this blog, we are going ahead with Heartbeat. So, when there is no heartbeat, we consider the server dead and flip the switch to do something about the incident.
Our demo app
So here's the plan, we will make a very simple Flask app and implement a library called apscheduler to periodically ping our monitoring service. We will use another library called requests to send a GET request to the monitoring service. Our requirements.txt for this project looks like:
Flask==3.0.2
APScheduler==3.10.4
requests==2.31.0
Our goal here is not to build a flask app, so I just made an app that gets a random cat image (😸) from an API and renders it.
import requests
from apscheduler.schedulers.background import BackgroundScheduler
from apscheduler.triggers.interval import IntervalTrigger
from flask import Flask, render_template_string
app = Flask(__name__)
scheduler = BackgroundScheduler()
def send_heartbeat():
    print('The cat is alive 😸, heartbeat sent!')
    requests.get('<heartbeat-monitoring-service-url>')
scheduler.add_job(
func=send_heartbeat,
trigger=IntervalTrigger(minutes=1)
)
scheduler.start()
@app.route('/')
def hello_world():
res = requests.get('https://api.thecatapi.com/v1/images/search')
url = res.json()[0]['url']
width = res.json()[0]['width']
height = res.json()[0]['height']
return render_template_string(f'<img src="{url}" width="{width}" height="{height}"></img>')
if __name__ == '__main__':
app.run(debug=True)
In the above code, BackgroundScheduler class is used to run a separate thread in our flask app, which pings our monitoring service. To set the schedule of the heartbeat request IntervalScheduler is used. I have used 1-minute intervals for practical reasons. You can change the interval ranging from seconds to weeks as per your requirement.
Let's run our app:
$ python app.py
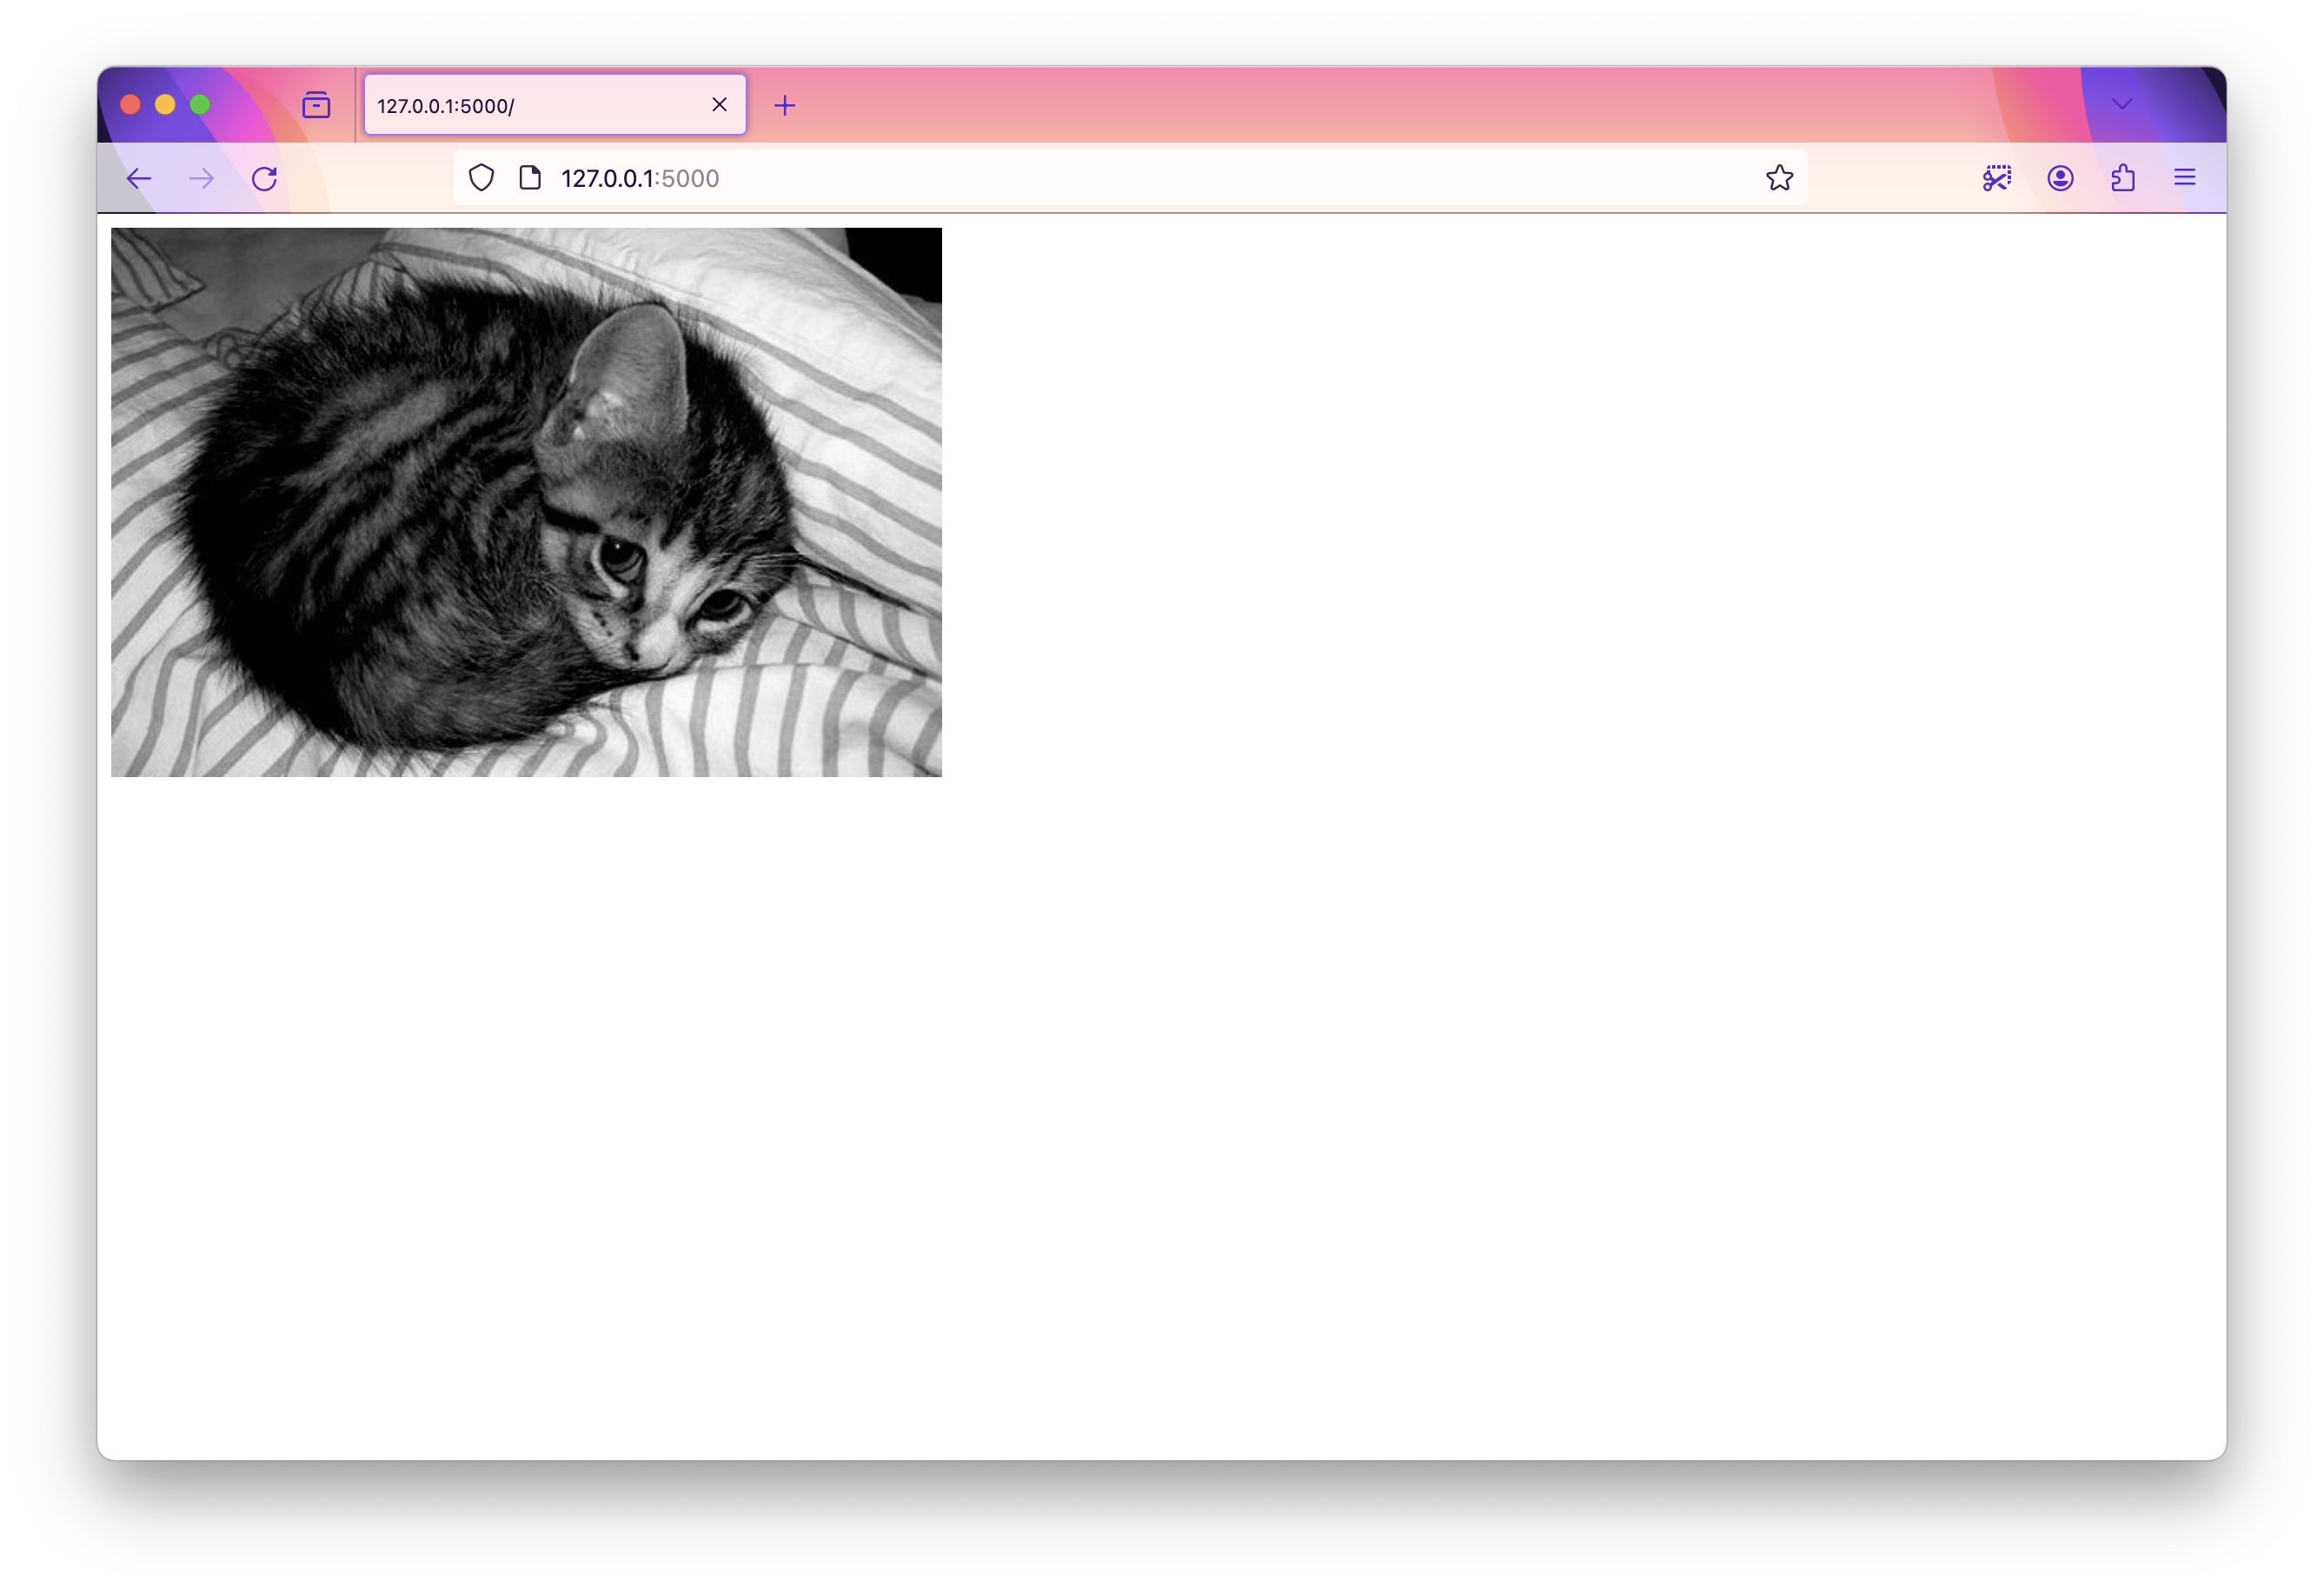
Finally, our app looks like this when run locally -
healthchecks.io is a great open-source tool for monitoring cron/background jobs and has a lot of integrations built in to notify us via email, webhook, SMS, phone calls, discord, slack, telegram, WhatsApp, teams and many more ways. They have a fully managed service that charges around 5$ / month. But as it is open-source, we can easily self-host it for almost free (like free-tier VMs in Google Cloud). I will be showing how to send alerts if our app is down via emails, calls, and SMS.
Before we get started with configuring healthchecks.io, we need to configure another service that will help us route our emails, calls, SMSes and WhatsApp messages.
Sendgrid and Twilio
We will be using SendGrid for sending our emails and Twilio for calling, sending SMS and WhatsApp messages.
💡
SendGrid was acquired by Twilio in 2019, so we are technically two different services from the same company!
Sendgrid
Sendgrid is a very popular email delivery platform that helps businesses send both marketing and transactional emails with features like email templates, tracking and analytics. We would not need all of these features, just mail-sending will do!
Go to https://sendgrid.com/en-us/solutions/email-api and sign up, after finishing all the steps, you'll be looking at a page like this:

Click Create sender identity button, you will be presented with a form like this:
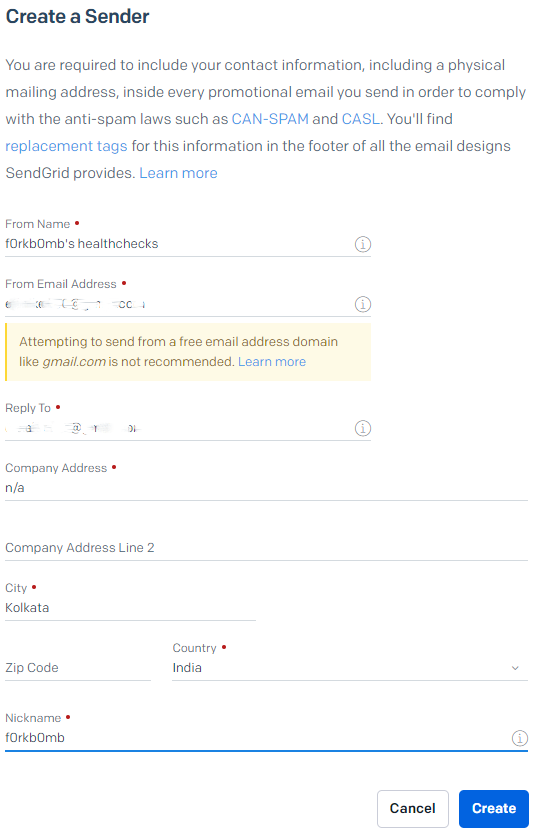
As this is only a demo, I have filled in only the necessary details. You can use your own gmail address as from email address and reply-to address. After you click create, a verification mail will be sent to your gmail inbox, follow the instructions to verify your email.
Once you are done, go back to https://app.sendgrid.com/ and click Email API -> Integration Guide. Choose the option SMTP Relay.
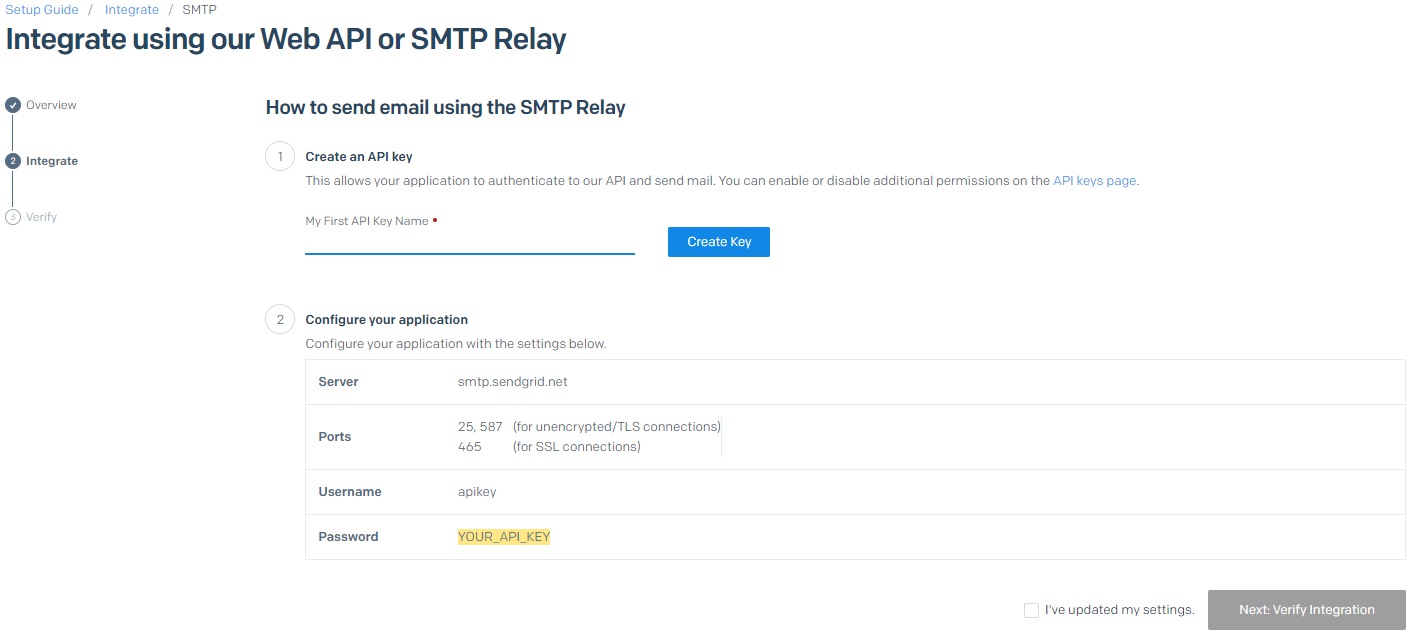
Now, give a name to your API key and create one. Once the API key is created, save all of the configuration options somewhere safe. We will use these later.
Twilio
Twilio is a cloud communications platform that equips developers with the tools to build communication features directly into their applications. These features can include things like - SMS, calls, chat and video conferencing applications.
Twilio provides the building blocks for developers to create a variety of communication experiences within their software. They accomplish this through a set of Application Programming Interfaces (APIs) that can be integrated into the developer's code. We will be using these powerful APIs of Twilio from our healthchecks.io deployment. But first, we need to sign up for a Twilio account.
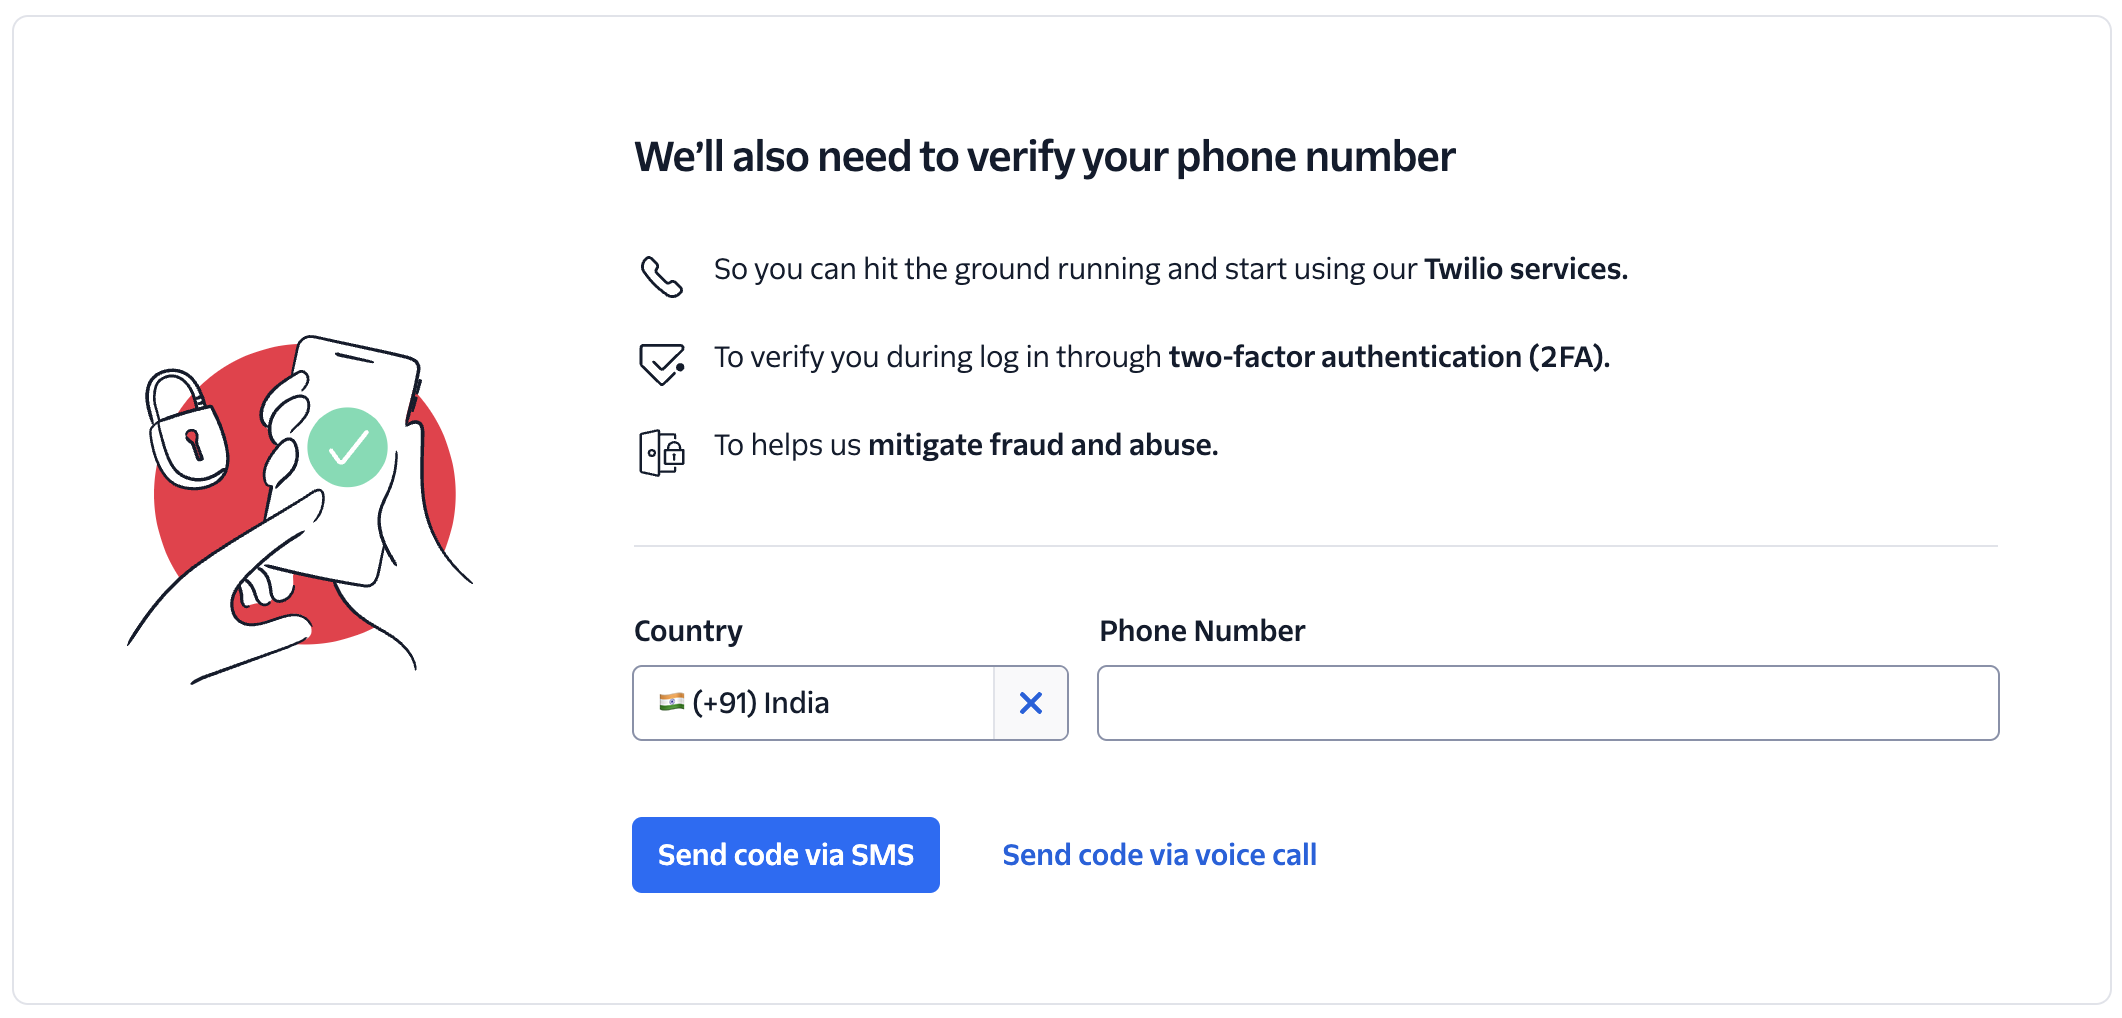
Go to https://www.twilio.com/try-twilio and sign up with your email, you can also sign up faster using your Google account. After this step, Twilio will ask you to verify your phone number (this verification is mandatory). You can either verify via an SMS or a voice call.
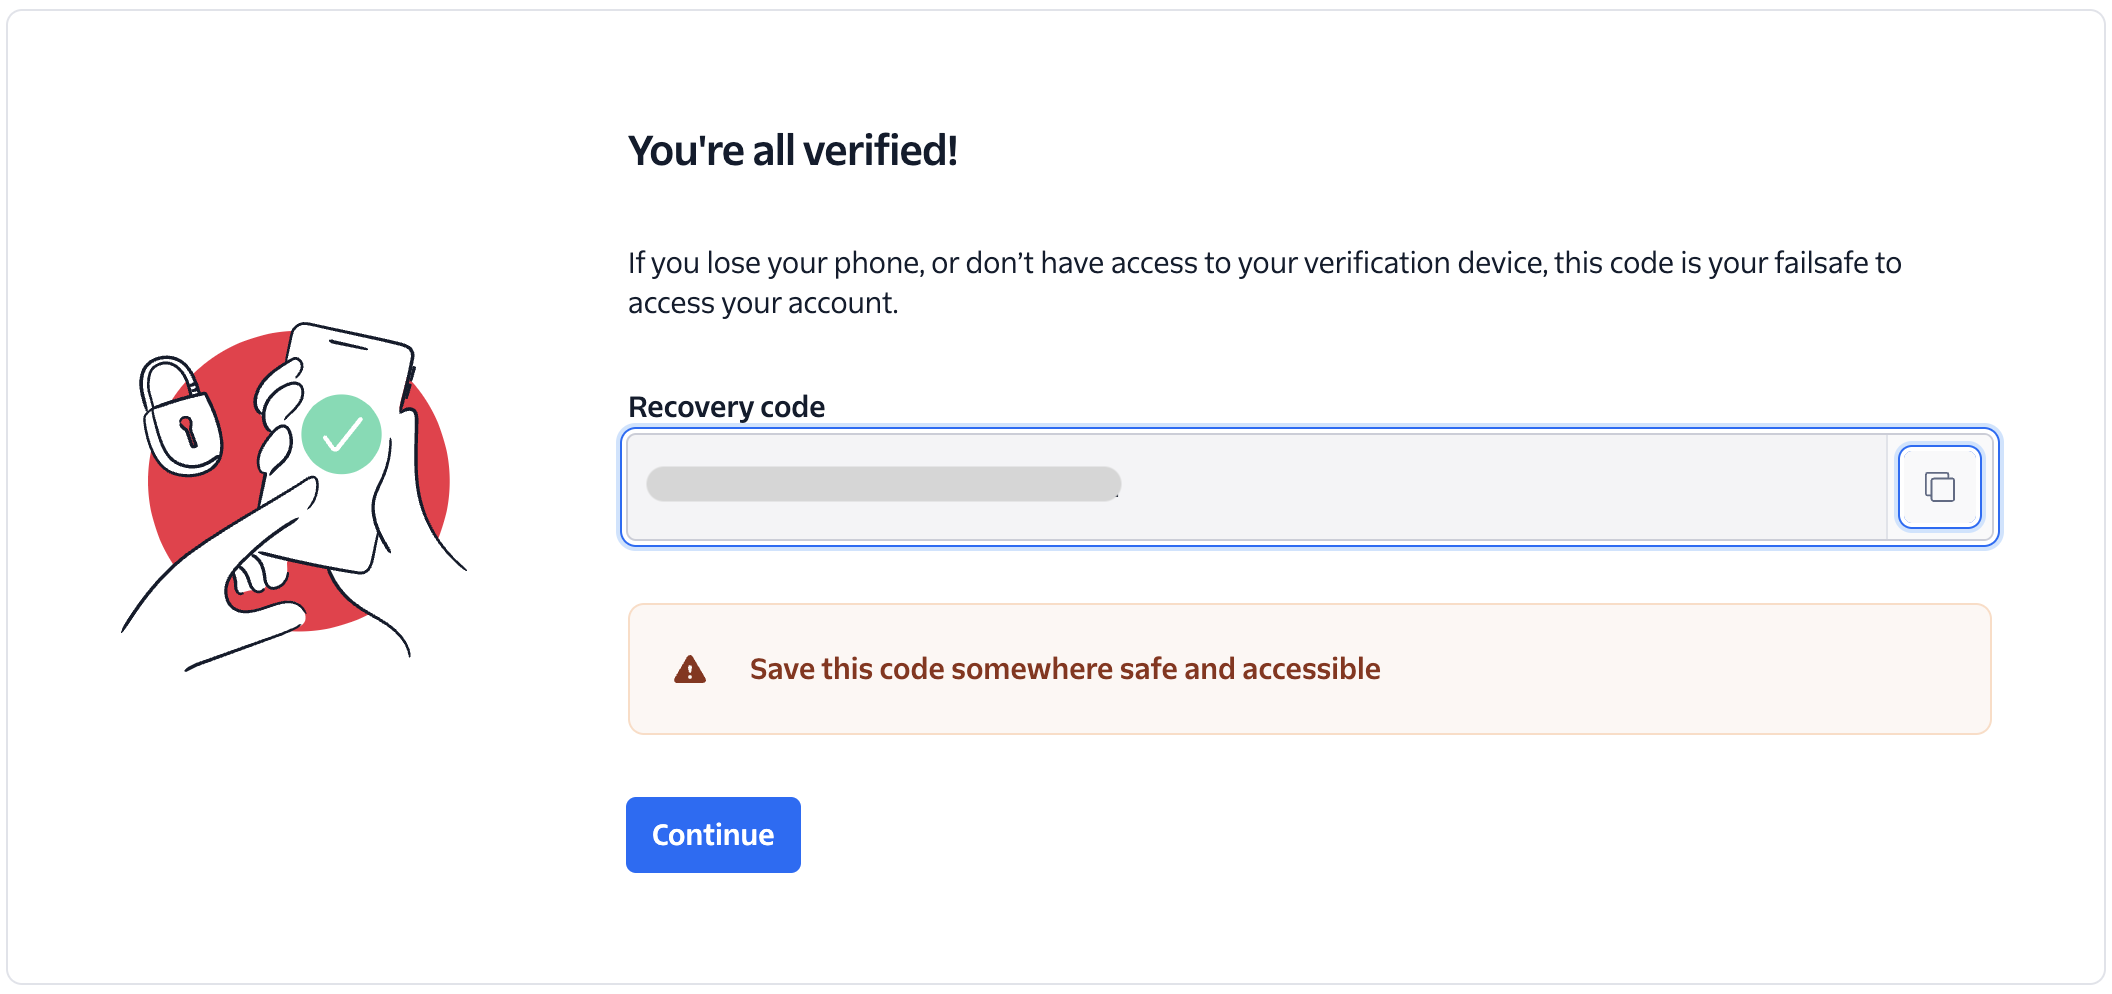
After the verification is complete, you will get a recovery code, please save it somewhere safe!
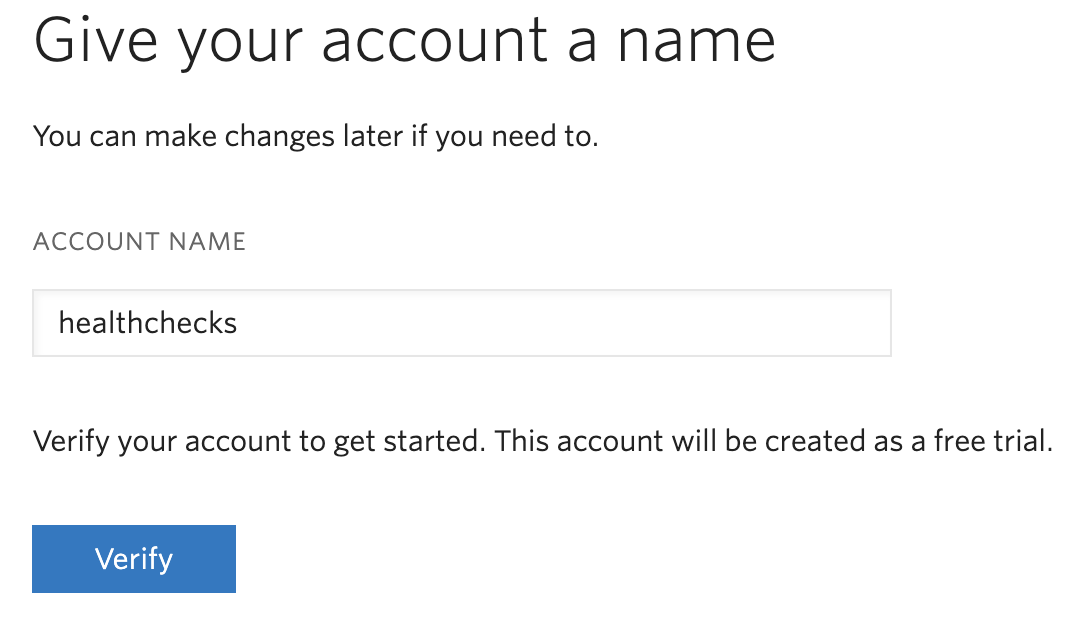
Next, create your account, give it a name and click verify to start your trial.
💡
Twilio might ask to verify your phone multiple times!
Once the account creation and verification are completed, you will be redirected to the Twilio console and there you will be asked to get a Twilio phone number. This step is mandatory for sending SMS and dial numbers. Click get a phone number and Twilio will assign a random US phone number to you from their pool of numbers.
Once you get a number, scroll down the console homepage and you will see the Account Info section with Account SID, Auth Token and My Twilio phone number.
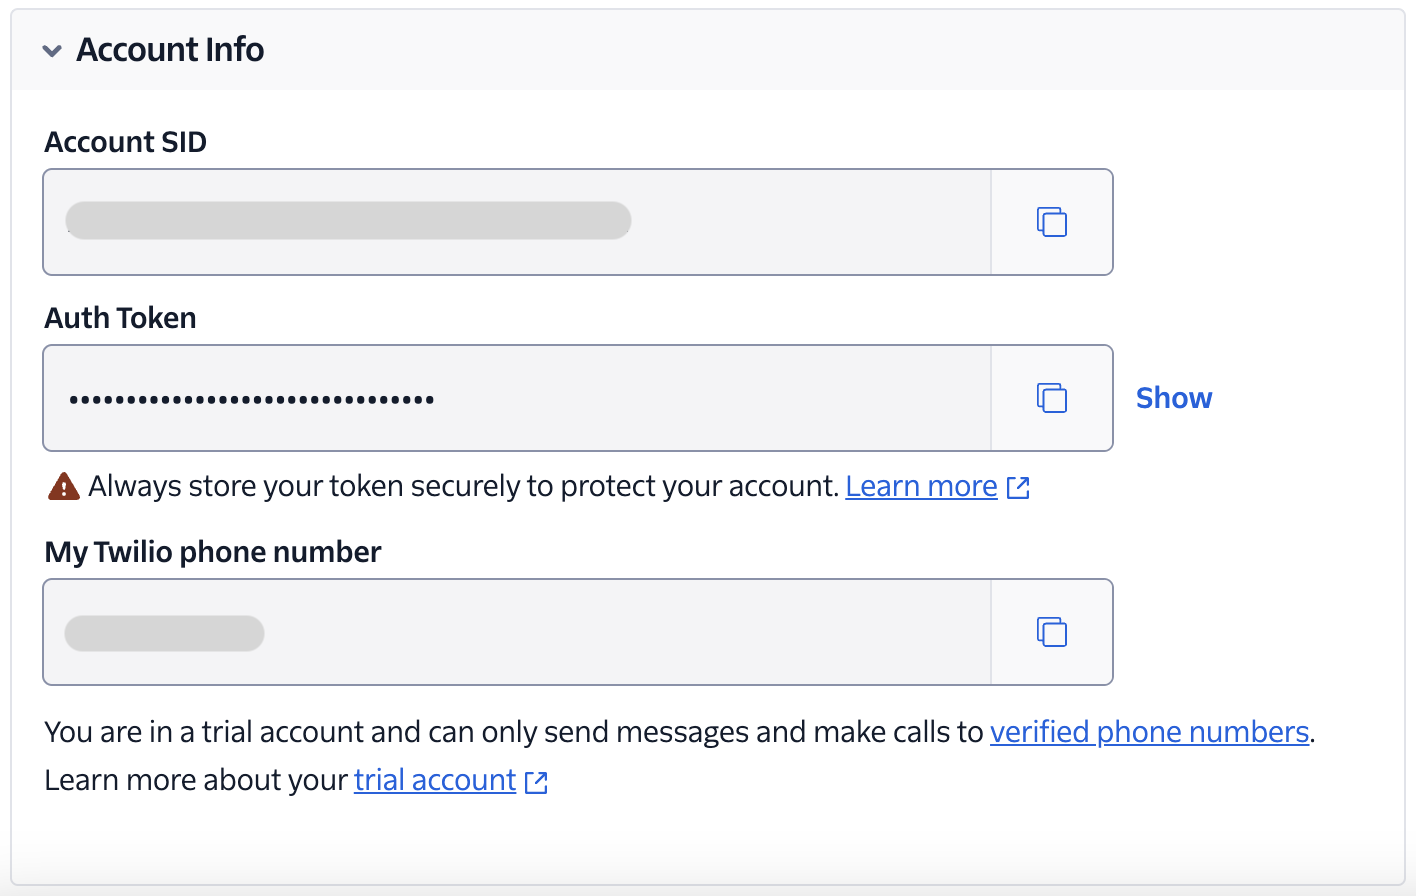
This is the information that we need to make calls and send SMS from healthchecks.io.
One last caveat, as this Twilio account is a trial account with no payment methods, we get credits of $ 15.50, but we can only make calls and send messages to the numbers that we verify. To verify a number, navigate to Phone Numbers -> Manage -> Verified Caller IDs and verify the number(s) that you want to receive a call/SMS on. Your own number (the number that you verified your Twilio account with) will already be added to the verified caller IDs.
Deploying healthchecks.io
Healthchecks.io is available as an open-source project on GitHub: https://github.com/healthchecks/healthchecks as mentioned earlier. It is built using a very popular Python web framework - Django. If you are not familiar with Django, it's fine, because setting up healthchecks does not need any Django expertise. The basic setup procedure is described in the readme.
To do this deployment we will be using two things:
A docker image of healthchecks (already available officially at DockerHub)
A PostgreSQL database instance for the database.
I will be using a service called render.com to host the healthchecks service which is a cloud platform that supports rapid development. It offers features to streamline the process of building, deploying, and scaling applications. It comes with a generous free tier to run under-development applications easily.
To get started, visit render.com and sign up for an account. Then follow these steps -
Create a PostgreSQL database
Click on New + and then click PostgreSQL.
Give a unique name to your instance, select a region that is closest to you (like I chose Singapore as I live in India), choose the instance type as Free (unless you want to pay and are doing a production deployment), and leave all the other options as default.
Click on Create Database.
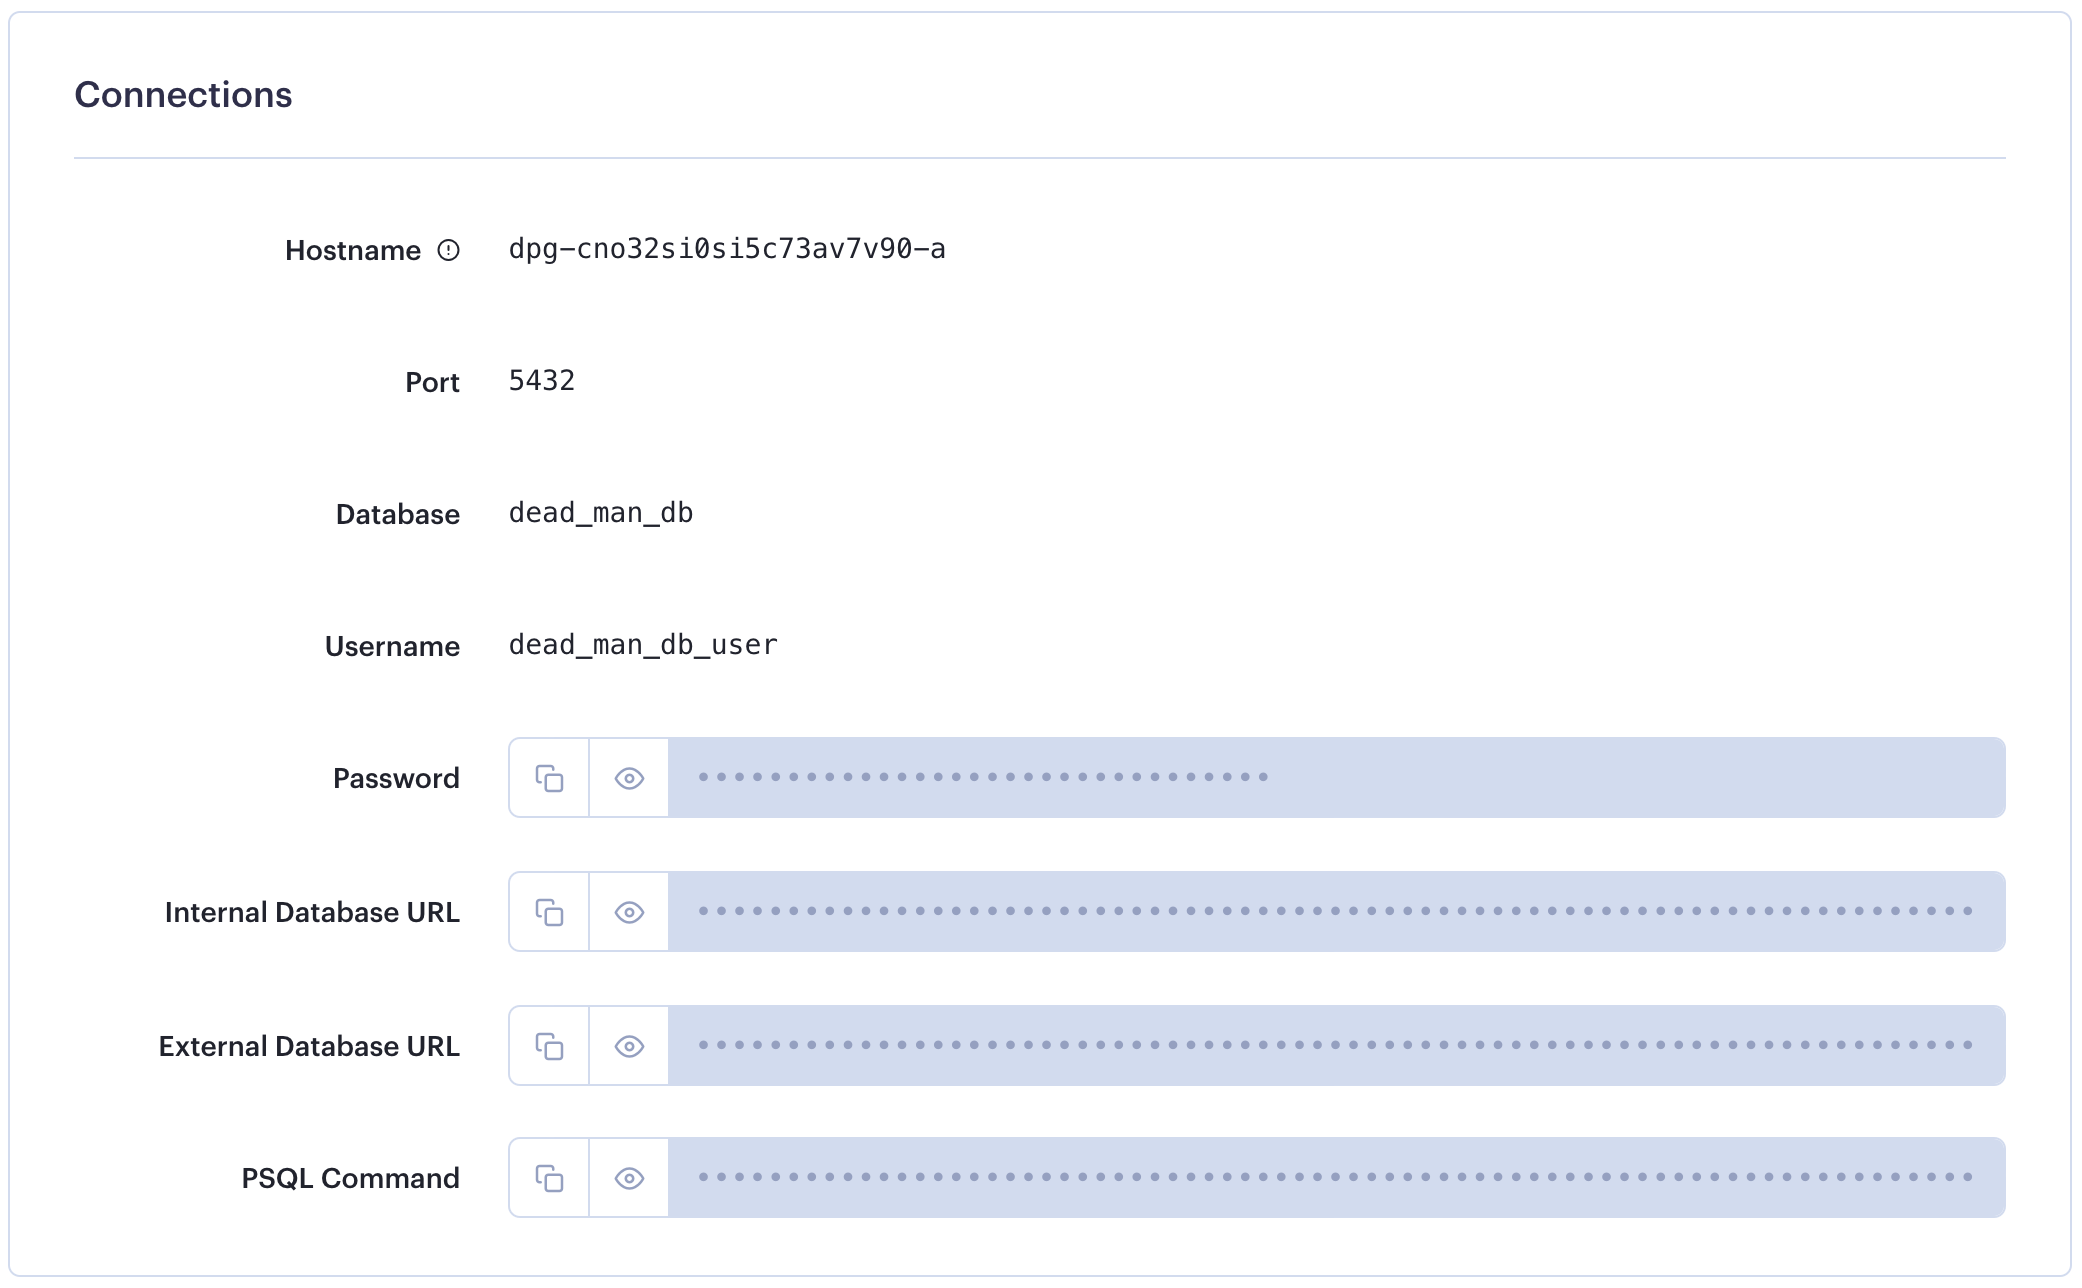
After the database is created, on the detail page there will be a connections section. We will need some of these pieces of information to connect to the db from our healthchecks container.
Deploy the docker image of healthchecks
On the render.com dashboard, click on New + and then click Web Service .
From the next page, choose the option Deploy an existing image from a registry.
Enter the Image URL as healthchecks/healthchecks (mentioned in the DockerHub page) and click next.
Now give a unique name, choose the closest region and Instance type as Free.
There is a section called Environment Variables where we need to set a lot of configuration parameters for our healthchecks instance. The variables come as key-value pairs and are explained in the following table.
| Key | Value | Remarks |
| ALLOWED_HOSTS | * | Who can access our healthchecks site |
| DB | postgres | Database type |
| DB_HOST | <postgres_db_hostname> | DB hostname found in postgres service created previously |
| DB_NAME | <postgres_db_name> | DB name found in postgres service created previously |
| DB_PASSWORD | <postgres_db_password> | DB password found in postgres service created previously |
| DB_PORT | <postgres_db_port> | Postgres database port, by default 5432 |
| DB_USER | <postgres_db_user> | DB user found in postgres service created previously |
| DEBUG | False | Django debug flag, keep it True until the deployment works correctly |
| DEFAULT_FROM_EMAIL | <sendgrid_sender_identity_email> | Sender identity email id from sendgrid |
| EMAIL_HOST | smtp.sendgrid.net | E-mail server hostname |
| EMAIL_HOST_PASSWORD | <sendgrid_api_key> | E-mail server authentication password |
| EMAIL_HOST_USER | apikey | E-mail server authentication username |
| EMAIL_PORT | 587 | E-mail server port, e.g. 25 (SMTP), 587 (TLS) and 465 (SSL) |
| EMAIL_USE_TLS | True | Force enable TLS |
| EMAIL_USE_VERIFICATION | True | Enable email verification |
| PORT | 8000 | Healthchecks container port |
| SECRET_KEY | <unique_unpredictable_key> | Used by Django to do any cryptographic operations, readmore 💡 |
| SITE_NAME | Dead Man Switch | Unique name of your site |
| SITE_ROOT | | Keep it blank for 1st time, more details later ⚡️ |
| TWILIO_ACCOUNT | <twilio_account_sid> | Twilio account SID from Twilio dashboard |
| TWILIO_AUTH | <twilio_auth_token> | Twilio account auth token from Twilio dashboard |
| TWILIO_FROM | <twilio_phone_number> | Twilio allocated phone number for caller ID and sms |
💡
You can generate a
SECRET_KEY using this
site.
After filling in all the environment variables, click Create Web Service. The service will be deployed within a few minutes.
After the deployment is done, on the service page you will find the service URL that looks like this: https://<service_name>-<random_string>.onrender.com
Copy the URL, and then go to the Environment tab of the left sidebar and paste it as the value of SITE_ROOT. Click Save Changes to save and restart the deployment.
Once the deployment is done, our healthchecks site will be up at the URL.
Sign up and set up healthchecks
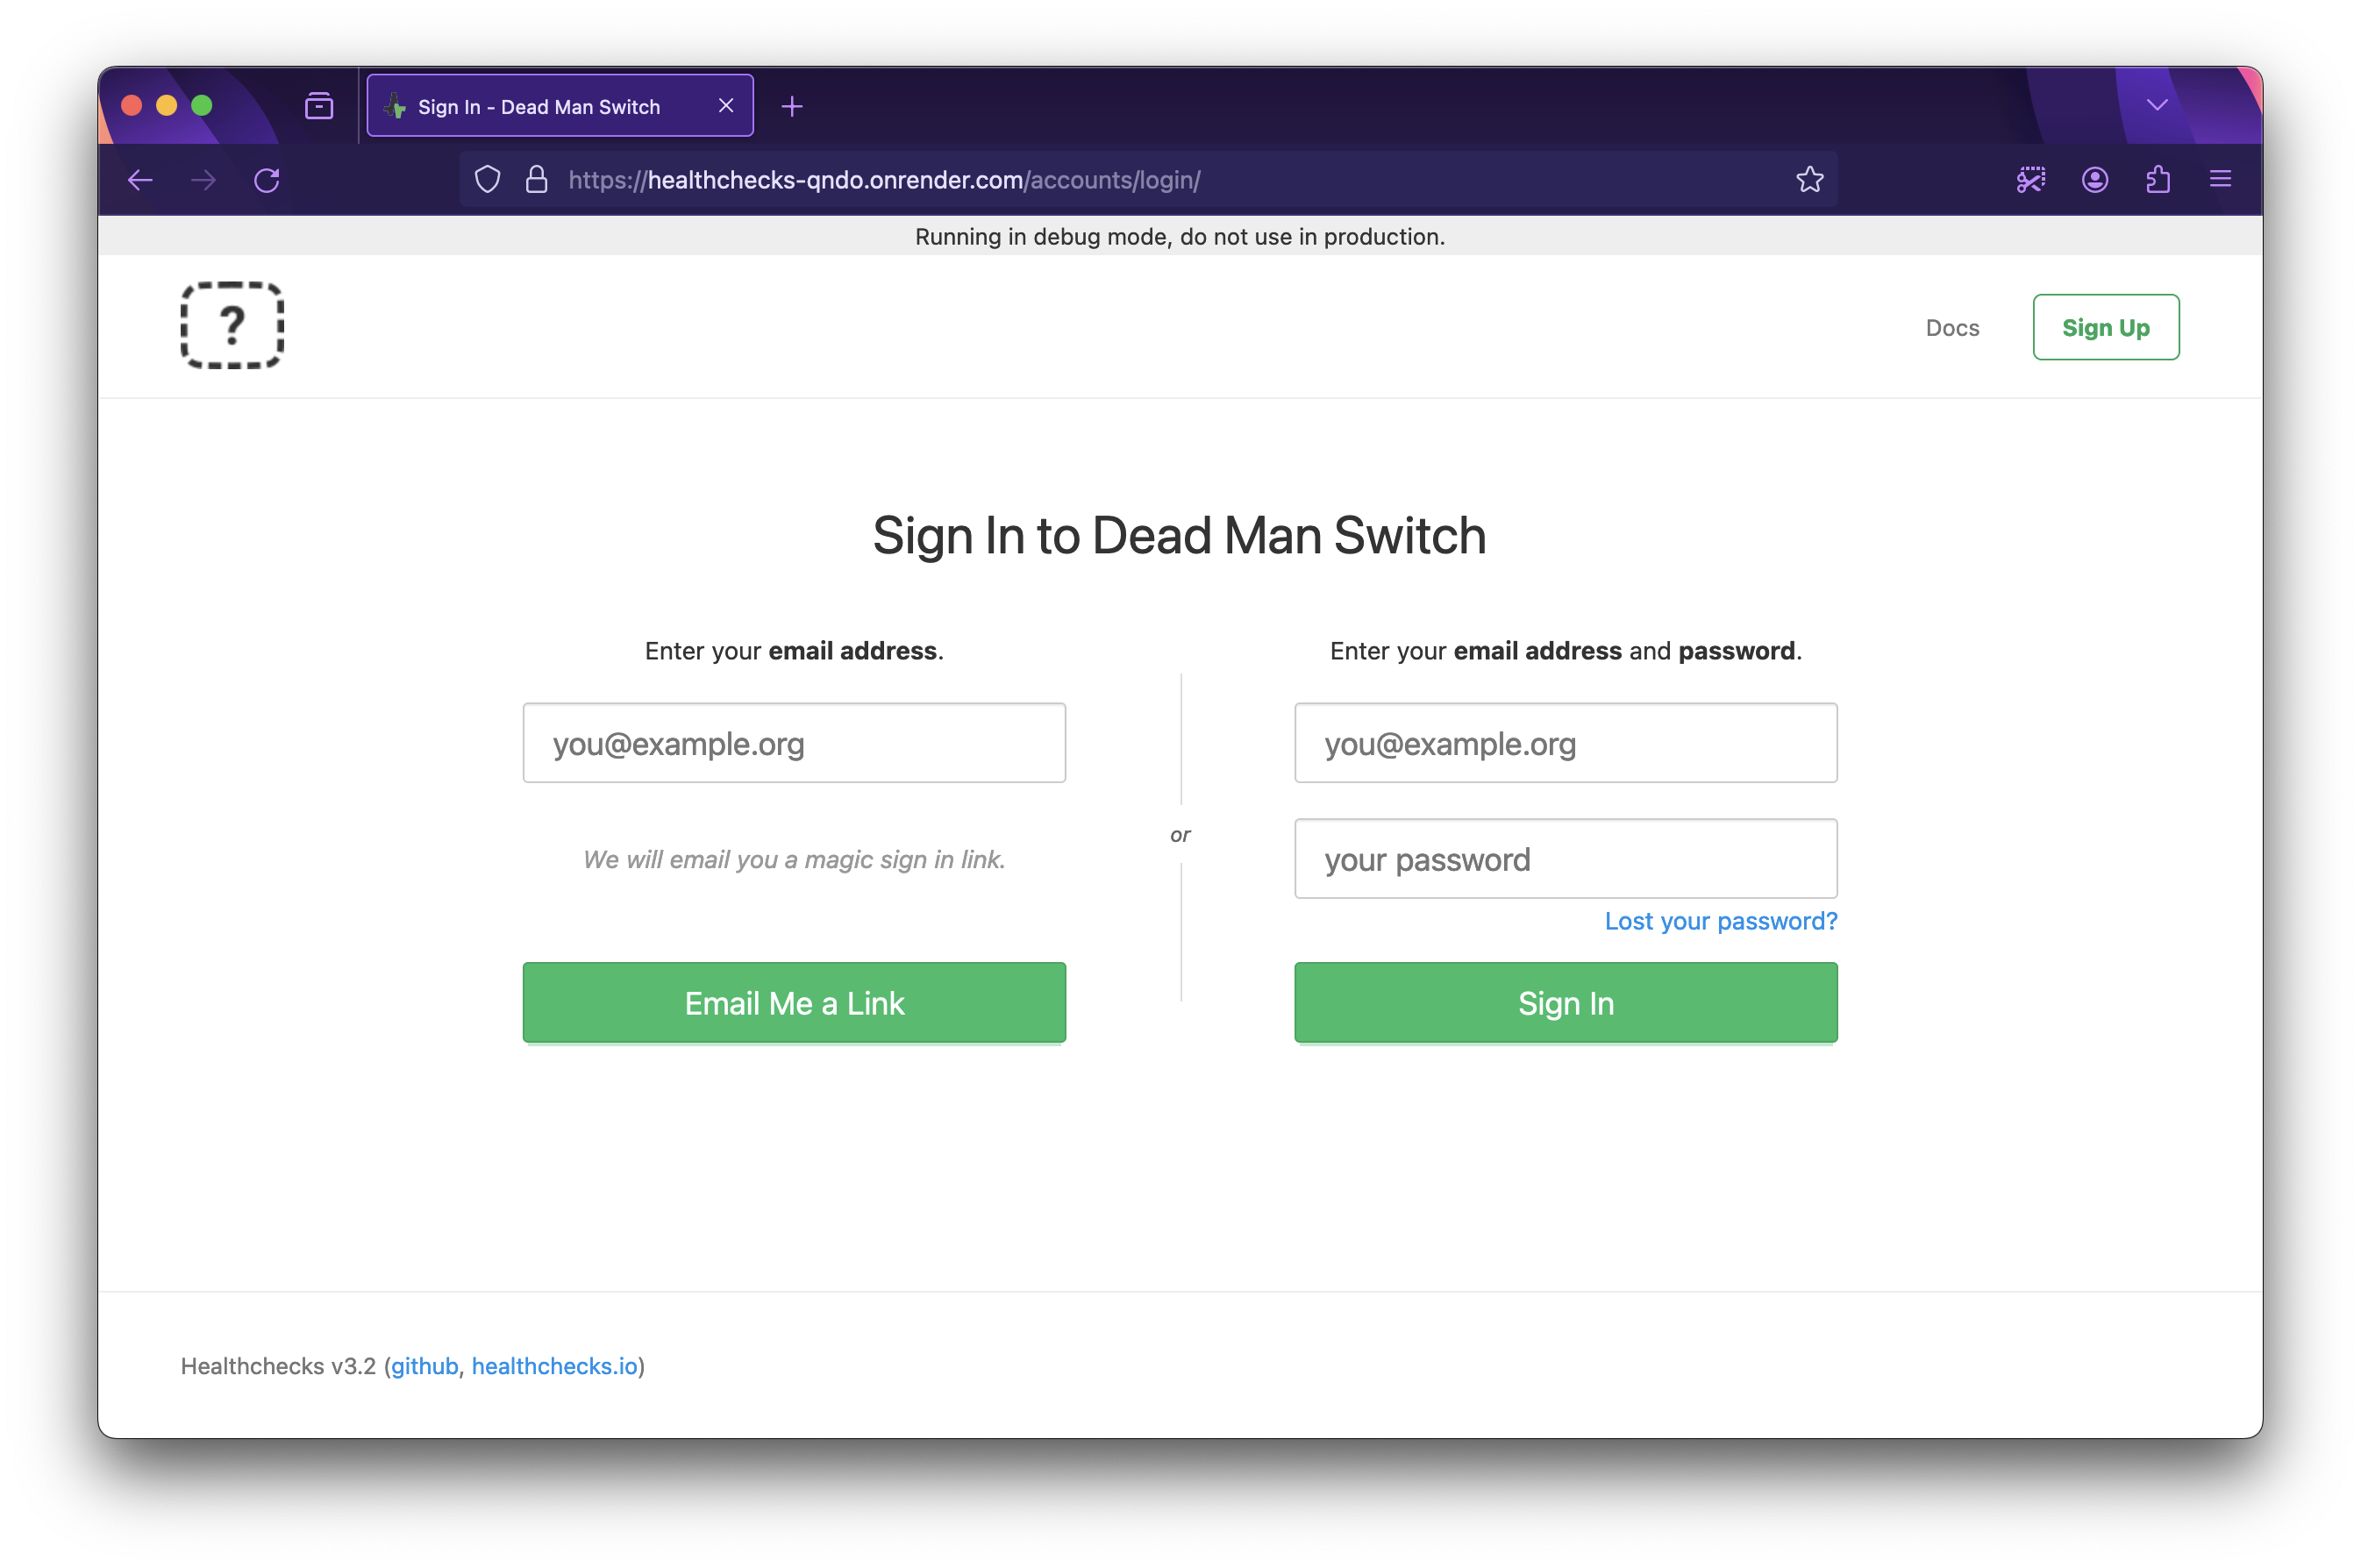
Click Sign Up on the top right corner of our healthchecks site, enter your email address and click Email me a link. You will receive a login link in your email.
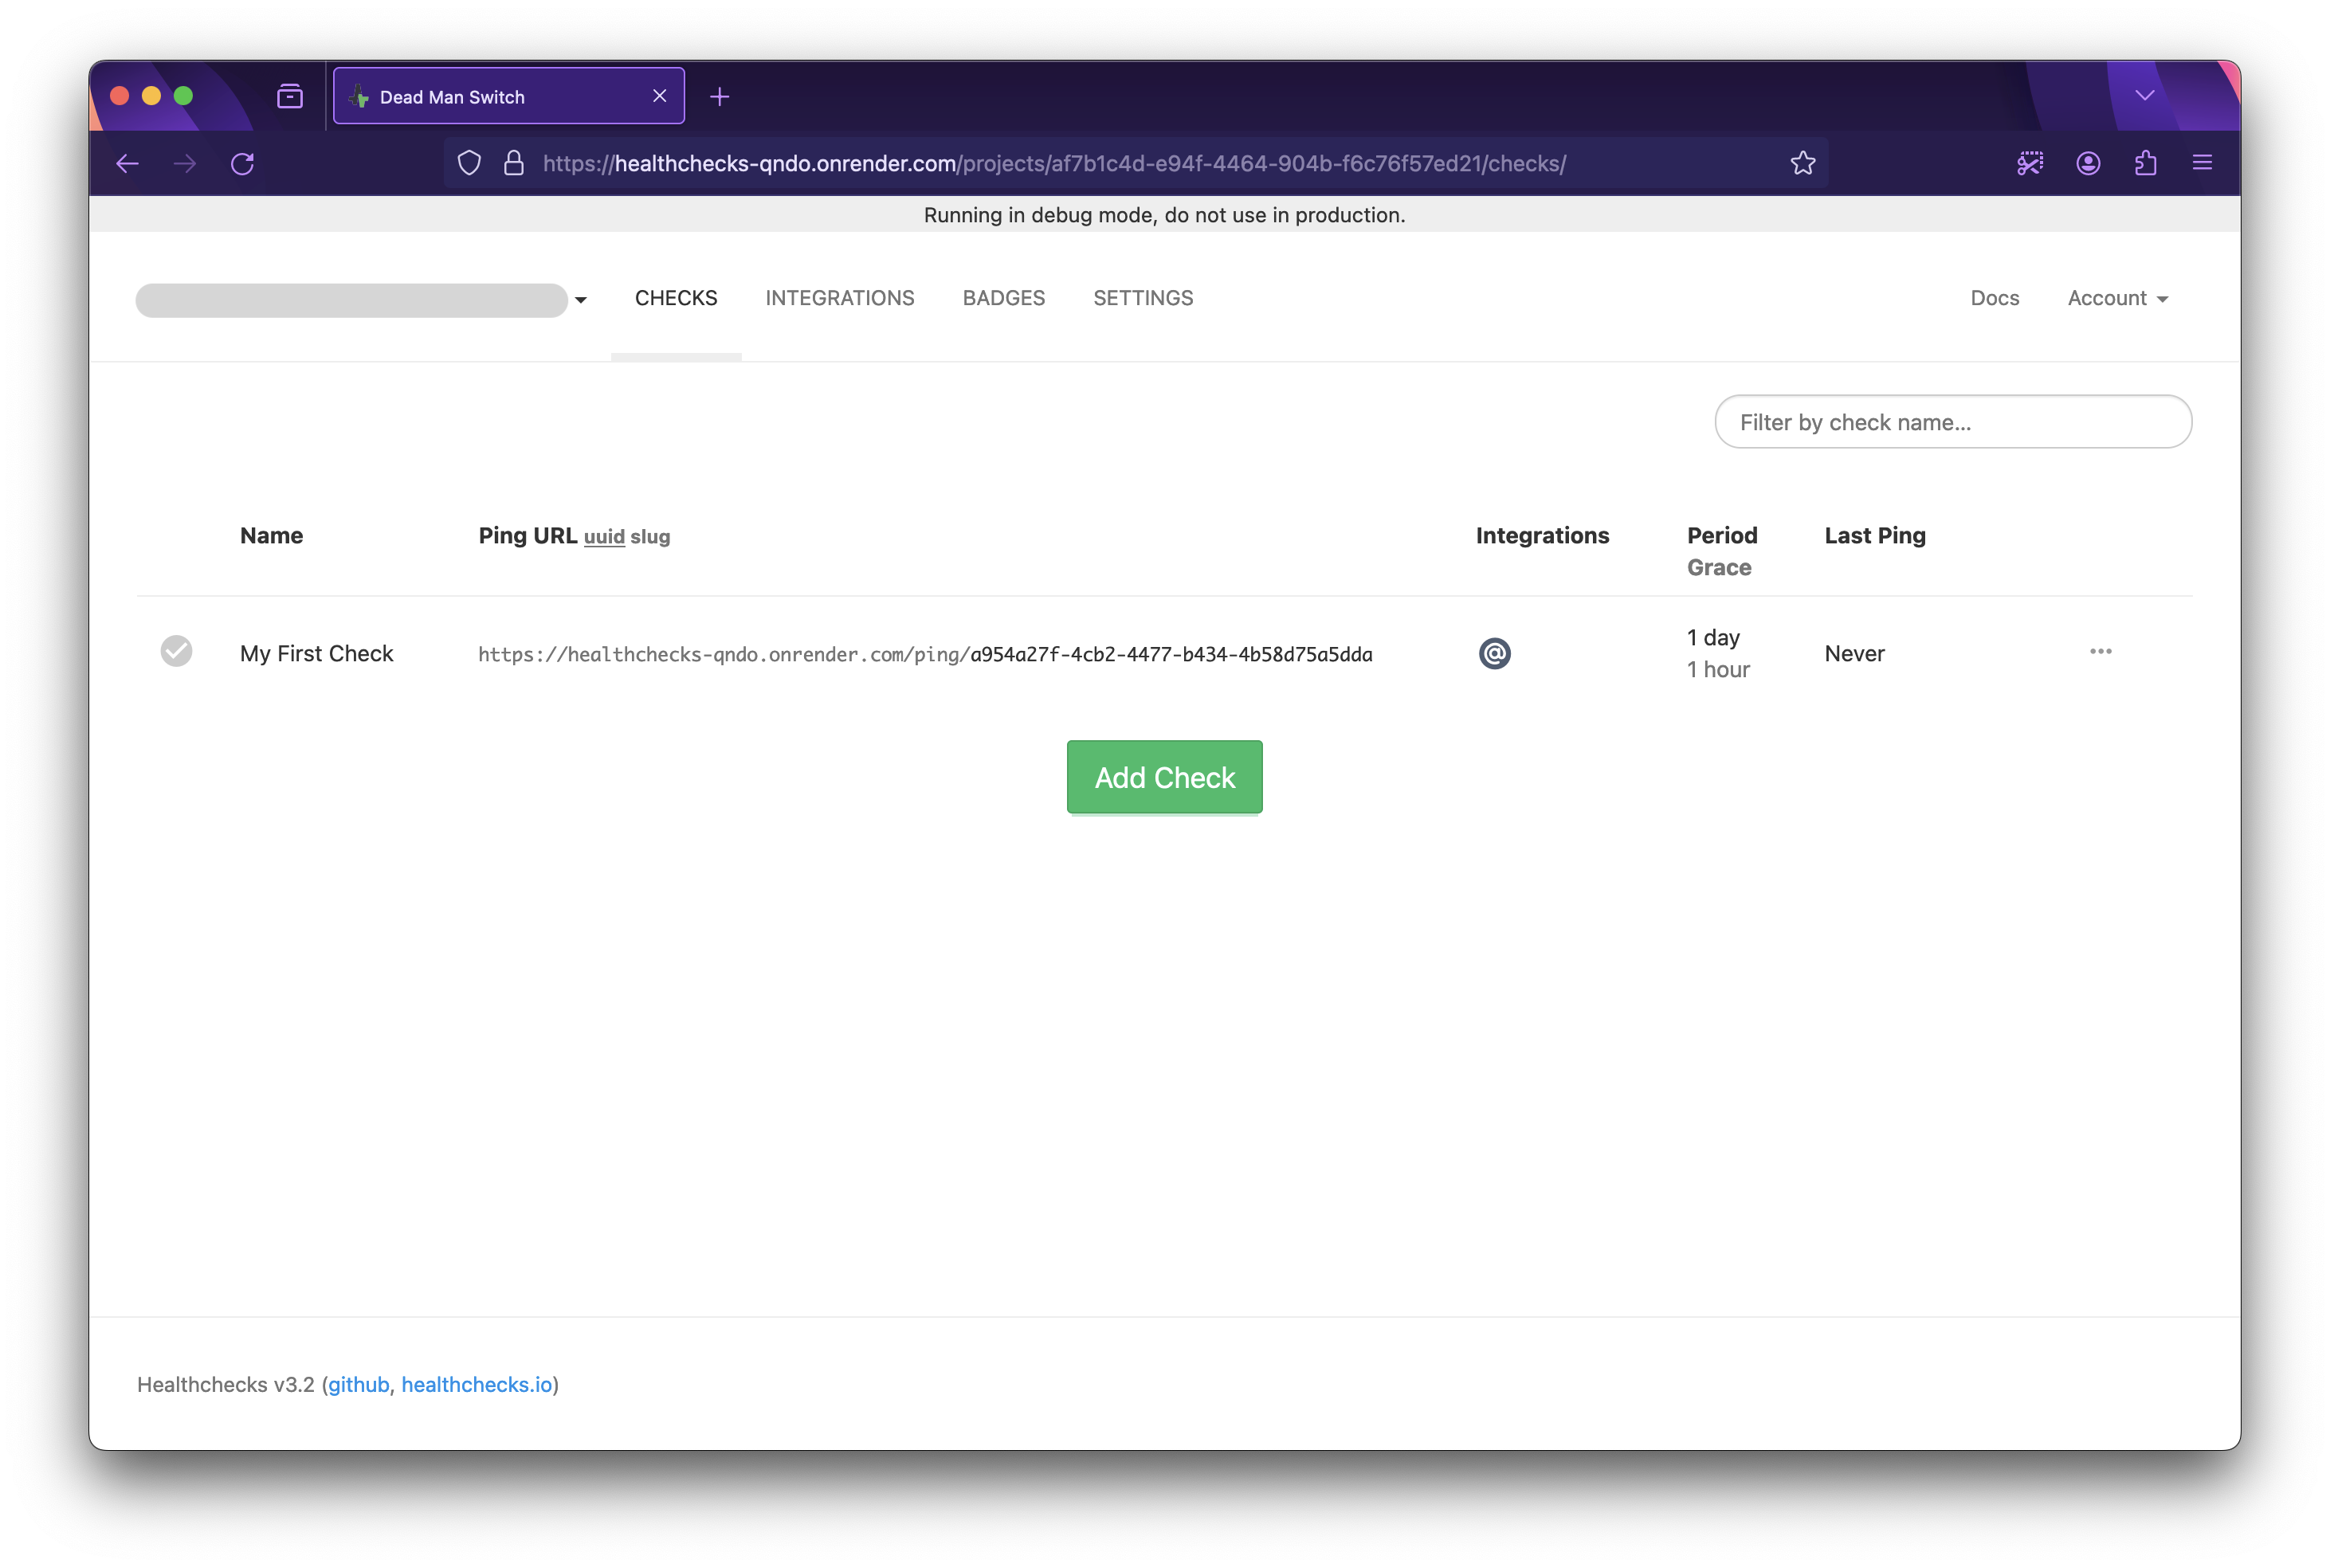
Once you click the login link, you will be directed to the home page that looks like this below:
- Now that we are ready with a working deployment, let's proceed with the call and SMS notifications.
How checks work in healthchecks.io
You register a check in the dashboard, and you get a ping URL.
Every new check is marked as inactive at the start.
Every check has a period and grace time setting.
You can set the period via simple interval, cron string or onCalender expressions.
You need to configure your app (that you want to monitor) to send an HTTP HEAD/GET/POST/PUT request to the ping URL according to the interval. Once a check gets a ping, its status is marked as up.
If healthchecks does not receive the ping at the specified interval, the check is marked delayed and the grace time counter starts.
If there is no ping even within the grace time, healthchecks marks the check as down .
As soon as the check is marked down, healthchecks send notifications to all registered integrations associated with the check.
Call notifications
Call notifications use Twilio's API, which is built in with healthchecks. The idea is simple: call the specified number and play a predefined message when a check goes down. The steps are -
Go to Integrations menu and find Phone Call and click it's Add Integration button.
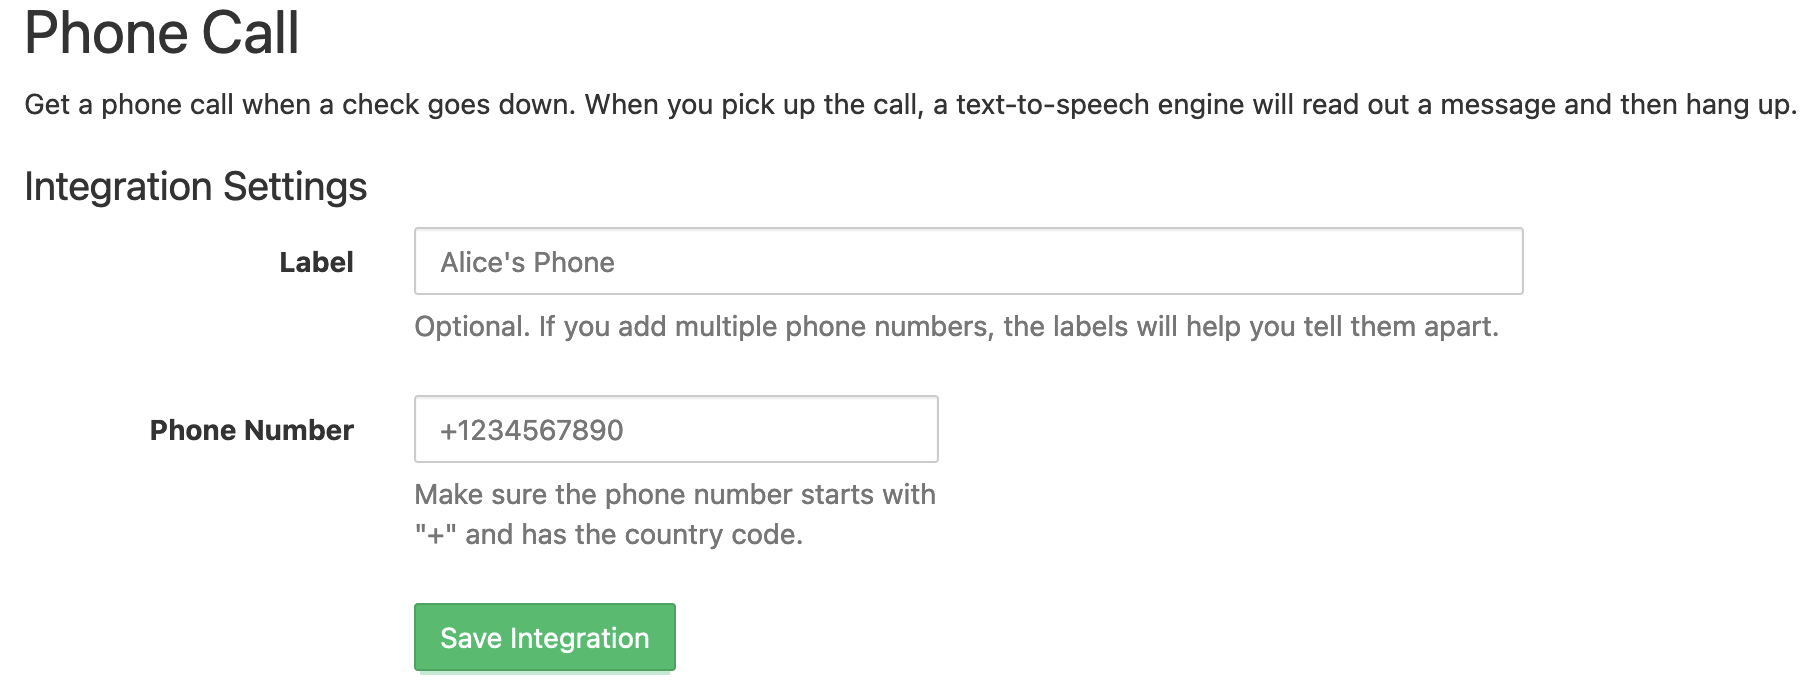
Add a Label and your phone number where you want to receive the alert call and save the integration.
💡
Note: As the Twilio account is a trial account, you must add a verified caller ID (phone number) here. Otherwise, this integration would not work.
Send a test notification From the integrations list to check if the integration works. You will receive a call within a minute if everything is working.

The audio sample for this test is given below:
SMS Notifications
SMS Notifications are very similar to phone calls as they also use Twilio APIs. To enable SMS notifications follow the steps -
In the Integrations menu find SMS and click it's Add Integration button.
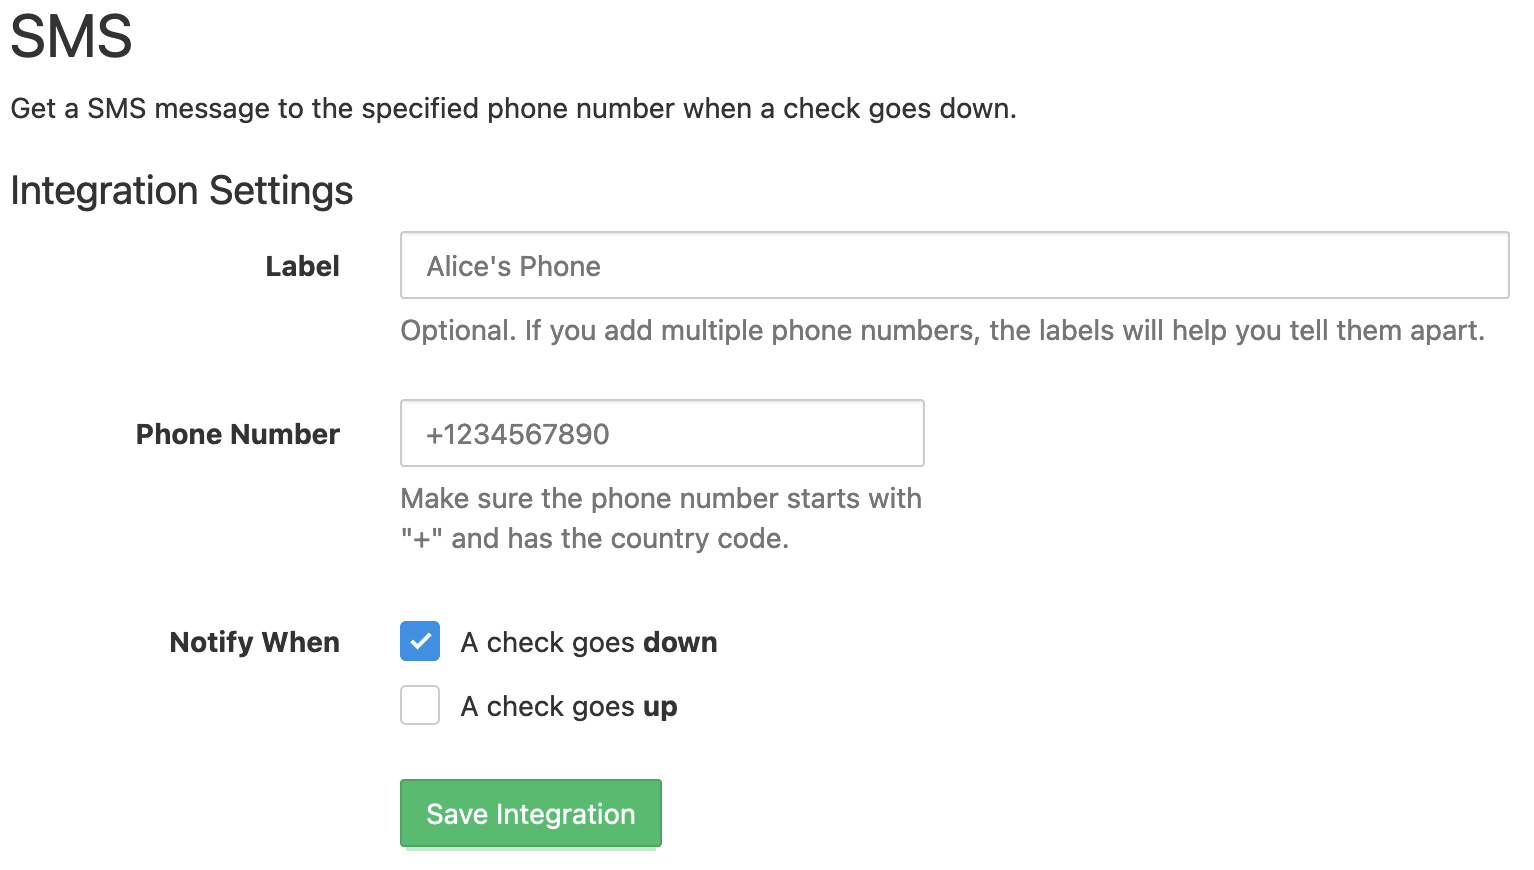
Add a label, your phone number, and check when you want a notification. Remember to verify your number if you are using a Twilio trial account.
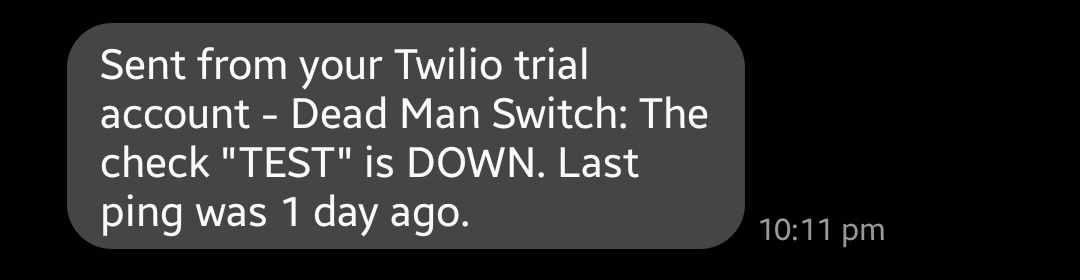
Send a test notification and verify the integration. A sample notification looks like this:
Email Notifications
The most basic integration, i.e. email should be already added as a sample where you get notifications in the email that you use to sign up. You can more email integrations if you want to send email notifications to more people.

Conclusion
Phew! That was a very long blog. If you are still here, thank you for reading!
Important takeaways for deployment
I have made a very quick and easy deployment of healthchecks which is never recommended for production use. The free tier of render.com is very limited where web services spin down when inactive and Postgres instances are deleted after 90 days. You should consider deploying healthchecks in a properly designed fault-tolerant VM or container to use it in production.
Aren't you forgetting something?
Remember our cat image generator app? You can now plug in the ping URL to this function below and get a health check every minute!
def send_heartbeat():
print('The cat is alive 😸, heartbeat sent!')
requests.get('<heartbeat-monitoring-service-url>')
Healthcheck will send a notification via call and SMS when your app goes down.
Please let me know in the comments how you are implementing your own use cases of heathchecks (my favourite use case is monitoring cron jobs that fail silently). If you like this post, please drop a like to this blog, and share it with anyone who might get some benefit out of it.
Signing off 😴.